


Welcome to our blog where we delve into the world of reviving your MacBook keyboard. In the YouTube video titled “Reviving Your MacBook Keyboard: A Guide to Key Replacement or Cleaning”, we explore the various topics surrounding the maintenance and care of your precious device. Let’s take a journey together as we uncover the secrets to keeping your MacBook keyboard in top shape through key replacement or cleaning. So grab a cup of tea and join us as we embark on this pastoral adventure into the world of MacBook maintenance.
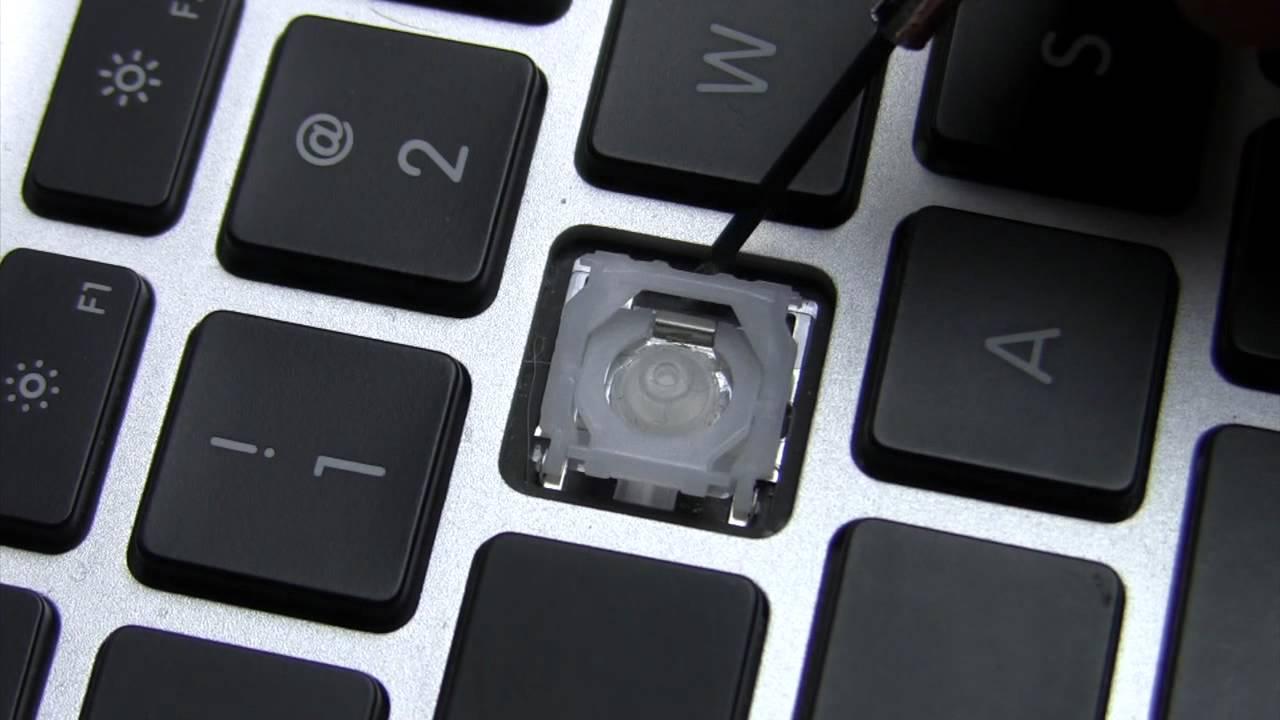
In order to properly care for your MacBook keyboard, it is essential to understand its anatomy. Knowing the different parts of the keyboard will help you navigate through the process of cleaning and replacing keys. The key components to be aware of are the keys themselves, the key switches, and the keycaps.
- Keys: The keys are the individual buttons on your keyboard that you press to input text or commands. They are attached to the key switches below and can be easily removed for cleaning or replacement.
- Key Switches: The key switches are the mechanisms below each key that allow it to register a keystroke. It is important to handle these switches delicately when cleaning or replacing keys to avoid damage.
- Keycaps: The keycaps are the physical covers that sit on top of the keys. They can be removed for cleaning or key replacement and come in various shapes and sizes depending on the model of your MacBook.
When it comes to safely cleaning your MacBook keyboard, it is important to follow the proper guidelines to avoid causing any damage. Before starting the cleaning process, make sure to turn off your MacBook and disconnect it from any power source. Use a soft, lint-free cloth dampened with a mixture of water and mild soap to gently clean the keycaps and surrounding areas. Avoid using harsh chemicals or excessive liquid to prevent any damage to the keyboard.
For those looking to replace keys on their MacBook keyboard, follow this step-by-step guide for a smooth and hassle-free process. Start by gently prying off the keycap using a key puller tool or a flat, thin object like a butter knife. Carefully remove the keycap and switch below, making sure to keep track of the placement of each component. Finally, align the new keycap with the key switch and press down firmly until it clicks into place. Repeat this process for any other keys that need replacing, ensuring that each key is securely attached.
Future Outlook
As we come to the end of our discussion on reviving your MacBook keyboard through key replacement or cleaning, I hope you found the information helpful and informative. Remember, taking care of your MacBook is essential for its longevity and performance. Whether you choose to replace a key or give it a good clean, know that by investing a little time and effort, you can breathe new life into your beloved device. Stay tuned for more tips and tricks on how to keep your MacBook in top condition. Until next time, happy typing!


